If payments have been added to a banking batch and processed, the only way of correcting a payment is to reverse the payment and create a payment reversal credit.
When should I create a banking batch?
After a payment has been added to a banking batch and processed from the Banking screen, the options to adjust the payment are very limited. Therefore, it is important that your practice create a banking batch at least each day, or more if required by your practice volume, to balance against EFT receipts, the cash drawer, cheques taken, direct deposits, and other accepted payment types to make sure that takings reflect payments recorded in Bp Premier.
What can I do if a payment was banked into the wrong account?
When you create a banking batch, the first field you select is Bank to Account. This is the bank account into which you will be depositing the amount. When you click Add to Batch, Bp Premier will list all the receipts that have not been added to a batch in the Unbanked payments screen.
If you have allocated a receipt to an incorrect bank account, you will have to delete the banking batch and create it again.
- Select Management > Banking
- Print out the batch so you can identify all the transactions that were included.
- Select the batch containing the incorrectly banked account and select File > Delete Batch. You will be prompted Are you sure you want to delete this batch?
- Click Yes to delete the batch.
- All the receipts from the deleted batch can now be included in a new batch against the correct bank account.
Reverse a banked payment
When you reverse a payment, Bp Premier prompts you to create a credit transaction (a payment reversal credit), which is visible from the Patient Billing History and Account Holder History screens. You can then adjust, refund, or reallocate the credit transaction, depending on the original payment error.
For example, if a banked payment had been allocated to the wrong invoice, you would:
- Reverse the payment, creating a payment reversal credit.
- Use the credit to allocate to the correct invoice.
What if the payment was a cheque?
Banked cheques that have 'bounced' also need to be recorded to reflect money owed to the practice.
To reverse a banked payment:
- Open the Patient Billing History or Account Holder History screen for the patient, account holder, or contact.
- Tick the Show payments / deposits checkbox so that payments, deposits, and credits are visible.
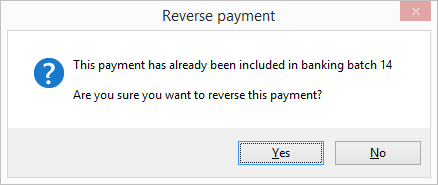
- Select the payment to be reversed and click Reverse. Bp Premier will prompt that the payment has already been included in a banking batch.
- Click Yes. The Reverse payment screen will appear.
- Select a Reason for reversal if an appropriate reason is listed, or enter free text to create a new reason.
- Tick Credit payment to payer's account?
- Click Ok to return to the Patient Billing History or Account Holder History screen. The credit you just created will appear with green shading.
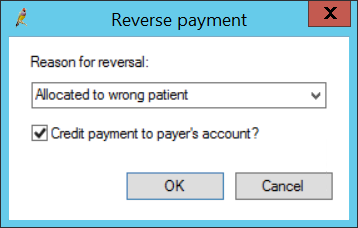
TIP Best Practice Software recommend always ticking this checkbox when reversing payments. This allows your practice to keep track of payment reversals in the Billing screens and make sure reversals are always reallocated or refunded. The default setting for this field is set by the Check the 'Credit payment...' box when reversing a payment field on the Billing tab of the Configuration screen.

You can use the Payment record number to track reversed payments.
How the reversed payment appears in Bp Premier
The green writing at the top of the screen ('A Deposit/Credit amount of 65.00 is available!' in the example above) indicates the value of the Deposit / Credit available. This is money that the practice has received from this patient or account holder but has not been allocated to pay an invoice, and is therefore 'owed' to the payer.
The reversed payment will be displayed according to the following conditions:
- If the payment reversed was a normal payment, the description will say 'Payment reversal credit'
- If the original payment was created by a deposit allocation, the description will say 'Deposit reversal credit'
- Both record types could appear if the reversed payment was a combination of a normal payment and deposit allocation
- The credit will appear on the Deposit / Payment Reversal Credit report
- The credit will not appear on the Banking screens, because no additional money has been taken.
If you tick the Include adjustments checkbox:
- An adjustment transaction will appear for a negative amount
- The negative adjustment transaction will appear on payment and transaction reports to reflect that an adjustment has occurred
- The negative adjustment will not appear on the Banking screens, because no additional money has been taken.
Refund a reversed banked payment
Once the banked payment is reversed, you can refund the credit to a patient if required.
- From the Patient Billing History screen, select the most recent deposit or credit record (in green).
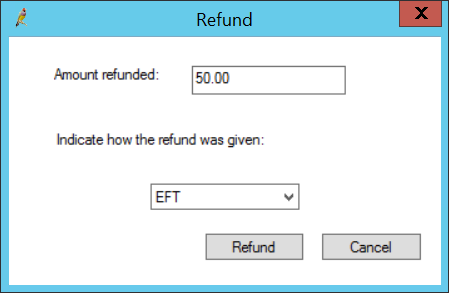
- Click the Refund button and the Refund screen will appear. By default, the screen shows the remaining deposit balance, but this value can be reduced.
- Select the payment type used to give the money back to the patient or account holder (for example, Cash or EFT) and click Refund.
- An adjustment will be created in the account holder transaction record and a negative value will appear in the Banking screen that can be taken into account when reconciling.
Adjust a banked payment
If a payment has been banked (added to a banking batch and processed), you can only change the Payment Location or Credit card type of the payment. Follow the instructions below.
If you need to make other changes, you must reverse the payment. Follow the instructions in Reverse a banked payment.
- Open the Patient Billing History or Account Holder History screen for the patient, account holder, or contact.
- Tick the Show payments / deposits checkbox so that payments, deposits, and credits are visible.
- Select the payment to be adjusted and click Adjust. Bp Premier will prompt that the payment has already been included in a banking batch.
- Click Yes. The Payment Details screen will appear showing the details of the payment.
- Change the Payment Location or Credit card type and click Process to save the change.
- Tick Include adjustments on the Patient Billing History or Account Holder History screen to see the adjustment included in the list of transactions.

What can I do if payment was allocated to the wrong invoice?
- Reverse the payment. You must tick the checkbox Credit payment to payer's account?. The payment reversal credit will appear in green shading on the Patient Billing History or Account Holder History screen.
- If the correct invoice does not exist yet, create the invoice.
- Open the Patient Billing History or Account Holder History screen for the patient or account holder.
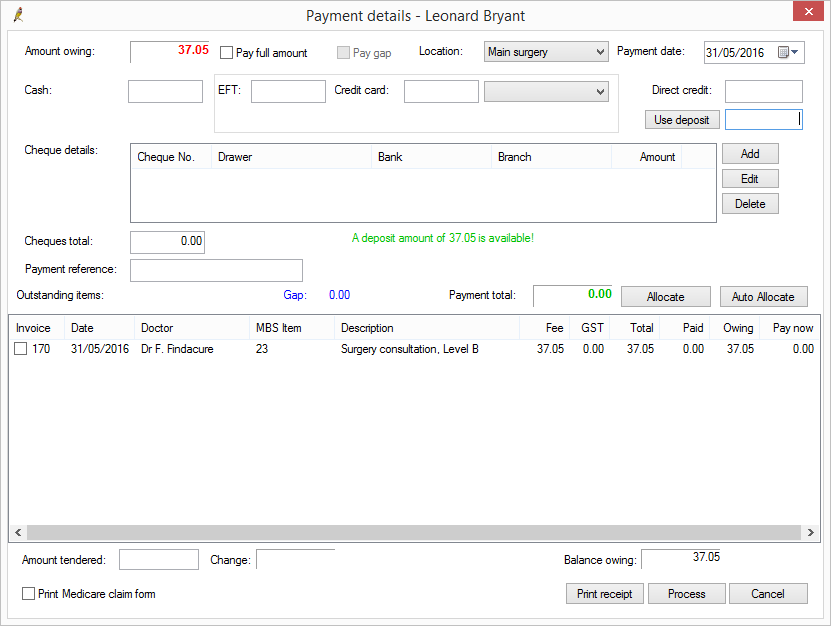
- Select the invoice you created in step 2 and click Pay Single Invoice. The Payment details screen will appear.
- The message in green text in the middle of the screen indicates how much deposit or credit is available to allocate to an invoice. Click in the field to the right of the Use Deposit button and click the button:
- If the available deposit or credit value is greater than or equal to the value of the invoice being paid, the full amount of the invoice will be shown in the Use Deposit field.
- If the available deposit or credit value is less than the value of the invoice being paid, the entire deposit or credit value will be shown in the Use Deposit field. You can pay the remainder of the invoice using any other payment method.
- Check that the Payment total in the middle of the screen is correct, and that each invoice or service line has the correct Pay Now value.
- Click Process to save the payment.
How the reversed payment appears in Bp Premier
- The Payment Reversal credit will disappear from the Patient Billing History or Account Holder History screen and a new payment record will appear.
- The new payment will not appear in a new banking batch, unless there was additional money taken via another payment method.
- The new payment will appear on the Management Reports used to pay providers, because the credit has now been allocated to an invoice and thus a provider.
What can I do if payment was allocated to the wrong patient?
If a payment was allocated to the wrong patient, you must:
- reverse the payment and create a payment reversal credit
- refund the reversal credit to the incorrect patient
- cancel the invoice, if the invoice was created for the wrong patient
- create an invoice for the correct patient's account
- enter payment against the new invoice.
Follow the instructions below.
- Open the Patient Billing History screen for the patient incorrectly allocated the payment.
- Reverse the payment. You must tick the checkbox Credit payment to payer's account?. The payment reversal credit will appear in green shading.
- From the Patient Billing History screen, select the payment reversal credit from step 2 and click Refund. The Refund screen will open.
- In the Indicate how the refund was given dropdown, select the same payment method used for the original payment.
- Click Refund to save the refund.
- If the invoice was created for the wrong patient, select the invoice in the Patient billing history screen and click Cancel. Select Yes when Bp Premier prompts you to confirm cancelling the invoice.
- In the Patient billing history screen, select File > Open Billing History. Search for the correct patient to assign the invoice to and click Select.
- If the invoice that needs to be paid already exists, go to step 9. Otherwise, click New account and create a new invoice.
- Select the invoice from step 8 and click Pay single invoice. The Payment details screen will appear.
- Process the payment as normal. However, you must select the same payment method as the original payment.
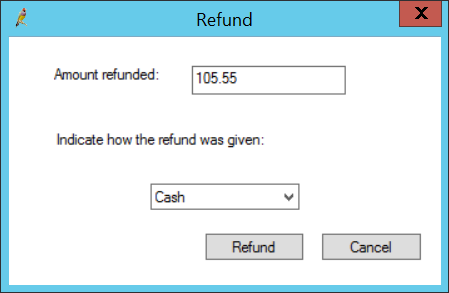
The full amount of the payment reversal credit will be displayed and should not be changed.
IMPORTANT Selecting the same payment method for the refund updates the adjustment record with the same method so that Bp Premier balances correctly. If you are unsure of the payment method for the original payment, close the Refund screen and double-click on the payment reversal credit to identify the payment method on the Deposit details screen.
The refund will appear on the Patient billing history screen when you tick the Include adjustments checkbox. The refund will also appear in the next banking batch for reconciliation purposes and on the Deposit / Payment Credit report.
NOTE If the payment was processed through Tyro, do not tick the Use Tyro check box, because this triggers a new tyro payment.
Correcting the payment is now complete.
How the reversed payment appears in Bp Premier
On the wrong patient's Patient Billing History screen:
- the payment reversal credit will disappear, but if you tick Include adjustments the refund record will appear in yellow
- the refund will appear in the next banking batch for reconciliation purposes and on the Deposit / Payment Credit report.
On the correct patient's Patient Billing History screen:
- the new payment will appear allocated to the correct invoice
- the new payment will appear in a new banking batch to balance the credit refund.
Both the reversed and new payments will appear on the Payment and Transaction Reports so that disbursements can be made to providers.
What can I do if a payment amount was wrong?
- Reverse the payment. You must tick the checkbox Credit payment to payer's account?. The payment reversal credit will appear in green shading on the Patient Billing History or Account Holder History screen.
- From the Patient Billing History screen, select the payment reversal credit from step 1. Click Refund. The Refund screen will open.
- In the Indicate how the refund was given dropdown, select the same payment method used for the original payment.
- Click Refund to save the refund.
- If the invoice needs correcting, select the invoice in the Patient billing history screen and click Adjust. Make the changes in the Account details screen and click Save.
- Select the invoice from step 5 and click Pay single invoice. The Payment details screen will appear.
- Process the payment as normal. However, you must select the same payment method as the original payment.

The full amount of the payment reversal credit will be displayed and should not be changed.
IMPORTANT Selecting the same payment method for the refund updates the adjustment record with the same method so that Bp Premier balances correctly. If you are unsure of the payment method for the original payment, close the Refund screen and double-click on the payment reversal credit to identify the payment method on the Deposit details screen.
The refund will appear on the Patient billing history screen when you tick the Include adjustments checkbox. The refund will also appear in the next banking batch for reconciliation purposes and on the Deposit / Payment Credit report.
Correcting the payment is now complete.
How the reversed payment appears in Bp Premier
On the Patient Billing History or Account Holder History screen:
- the payment reversal credit will disappear, but if you tick Include adjustments the refund record will appear in yellow
- the new payment will appear allocated to the correct invoice.
Both the refund and the new payment will appear in a new banking batch.
The refund will appear in the next banking batch for reconciliation purposes and on the Deposit / Payment Credit report.
The new payment will appear on the Payment and Transaction Reports so that the relevant disbursements can be made to the providers.
Related topics
Last updated 23 July 2020