
NOTE If you have upgraded to Saffron Service Pack 1, eOrdering should be configured through the eOrdering setup screen available via Contacts > Setup.
Bp Premier supports eOrdering of pathology and imaging investigations from providers that accept eOrders.
Before you begin
You will need the NATA code for any pathology laboratories. The NATA code determines the list of tests available from a pathology lab. If you wish to set up recommended tests based on clinical details, you will need to consult the laboratory for a recommended test list. Imaging providers do not require a NATA code for e-ordering from Bp Premier.
You may also need to install messaging software on each Bp Premier server or workstation that will be generating eOrders. The provider can tell you if you need to install any software (such as Fetch) and if the HL7 eOrder files need to be stored on a specific location on the machine.
How do I update the test list?
The eOrdering test list for registered providers is checked for updates and included in each monthly Bp Premier drug and data update. You do not need to do anything to update the test list.
Set up eOrdering for pathology
You must add the laboratory as a contact in Bp Premier and enable eOrdering.
- From the Bp Premier main screen, select View > Contacts. The Contacts screen will appear.
- Click Add new. The Contact details screen will appear.
- Select Company/Institution and select a Category of 'Pathology provider'.
- Complete the rest of the contact and identity details.
- Enter the NATA code for the laboratory and tab out of the field. If the NATA code is valid, the Setup E-ordering button will appear.
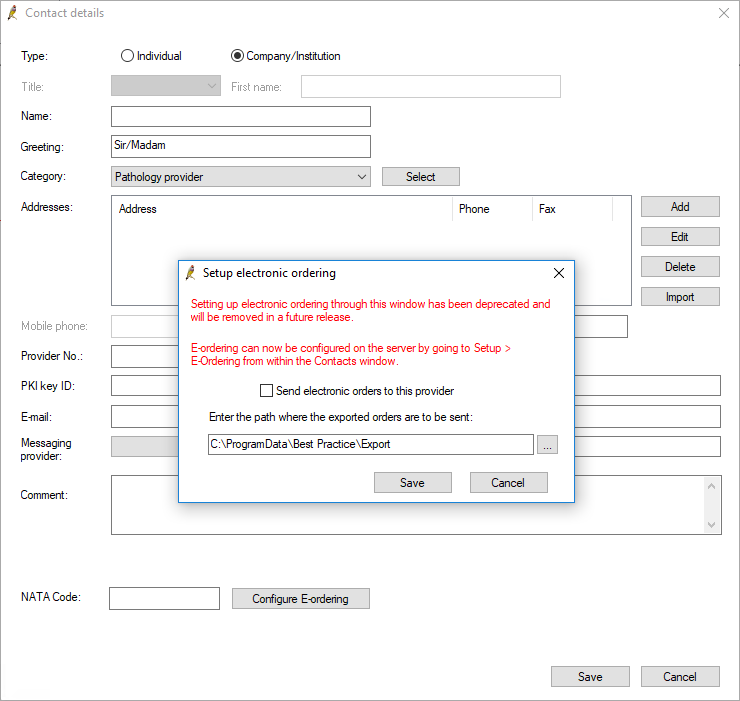
- Click Set up E-ordering. The Setup electronic ordering screen will appear.
- Tick Send electronic orders to this provider.
- Enter the path on this machine to store electronic requests. The pathology laboratory can tell you if eOrder files need to be in a specific folder.
- The Import test list button allows you to manually update the test list for the NATA code.
- If the pathology lab has supplied you with a list of recommended tests, click Import recommended tests and supply the location of the recommended tests .csv file.
- Click Save and click Save again to save the Contact record.
NOTE If you are using Saffron SP1, a notification will appear on the Setup electronic ordering screen advising that setting up electronic ordering through this window has been deprecated. You will also no longer be able to add test lists and recommended tests via this screen, as the new pathology eOrdering setup screen should be used for this purpose instead. See Set up Pathology eOrdering in Saffron SP1 or later for more information.
If the nominated folder does not exist, Bp Premier will not create the folder, but will place eOrder files in a default system folder when the request is generated.
Test lists are updated with each Bp Premier data update; you will very rarely be required to manually update the list.
You can now send eOrders to this laboratory.
Set up eOrdering for imaging
You must add the imaging provider as a contact in Bp Premier and enable eOrdering.
- From the Bp Premier main screen, select View > Contacts. The Contacts screen will appear.
- Click Add new. The Contact details screen will appear.
- Select Company/Institution and select a Category of 'Imaging provider'.
- When you enter the company Name, make sure that the text in Name matches the name of the supplied imaging provider exactly.
- Complete the rest of the contact and identity details.
- Click Set up E-ordering. The Setup electronic ordering screen will appear.
- Tick Send electronic orders to this provider.
- Enter the path on this machine to store electronic requests. The imaging provider can tell you if eOrder files need to be in a specific folder.
- Click Save and click Save again to save the Contact record.

Bp Premier will look up the imaging provider name in the database and name the outgoing HL7 file correctly.
NOTE If you are using Saffron SP1, a notification will appear in the Setup electronic ordering screen advising that setting up electronic ordering through this window has been deprecated.
If the nominated folder does not exist, Bp Premier will not create the folder, but will place eOrder files in a default system folder when the request is generated.
You can now send eOrders to this imaging provider.
Troubleshooting
Bar codes not printing correctly
If bar codes are not printing correctly on eOrdering forms, you may be able to resolve this issue by downloading and running the Bp Fonts utility.
- Navigate to the Bp Premier downloads page.
- Find the Bp Fonts utility and click Download.
- Navigate to the folder that you downloaded BpPremier_Fonts_QH.exe to. Right click the file and select Run as administrator.
You may see a warning that BpPremier_Fonts_QH.exe may not be safe to download. You can safely download and keep the file.
If the problem has not been resolved, contact Bp Premier support for further troubleshooting.
Related topics
Last updated 24 May 2022


 AU
AU 