
If you want to create spreadsheets and graphs in an external application like Microsoft Excel, you can create an ODBC connection to the Bp Premier database.
This method requires:
- the database browser password set in Bp Premier. See Browse the database.
- knowledge of pivot tables and charts in Excel.
This example uses Microsoft Excel 2007. Your version of Excel may have different menu options to select, but the overall process is the same.
Create a connection to the Bp Premier database
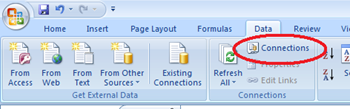
- From Excel, open the Data tab and select Connections.
- Click Add to add a new connection. A different connection must be created for each database table or query you want displayed in Excel.
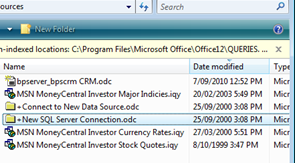
- Click Browse for more to open a template for creating a connection to your Bp Premier database.
- Select +New SQL Server Connection.odc option and click Open. The Data Connection Wizard screen will appear.
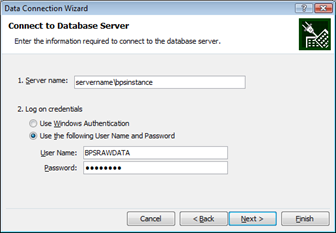
- In the Server name field, enter the Bp Premier server’s name followed by ' \BPSINSTANCE', as shown.
- Select Use the following User Name and Password and enter 'BPSRAWDATA' as the User Name.
- In the Password field, enter the database browser password set in Bp Premier.
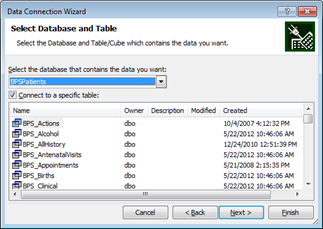
- Click Next. The wizard will prompt for the database to connect to.
- In most cases, you will want to connect to BPSPatients. Select this database from the drop down list. This will display all the tables in the database.
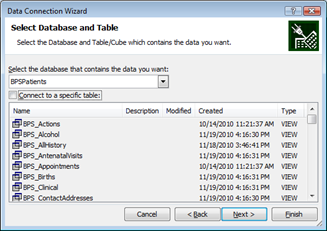
- Untick Connect to a specific table if you want to connect to all tables. Otherwise, keep this option ticked and select the table you want to import data into Excel.
- Click Next. The wizard will prompt for a connection file name and description.
- Select a meaningful File Name and enter a Description that can be recognised by other users.
- Tick Save password in file and Always attempt to use this file to refresh data.
- Click Finish. Excel will prompt with a warning about unencrypted passwords.
- Click Yes. You will be prompted to select a specific table from the list.
- Accept the defaults. You can add a query to a saved connection in the next step.


Add a query to your connection
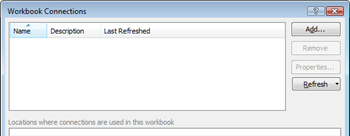
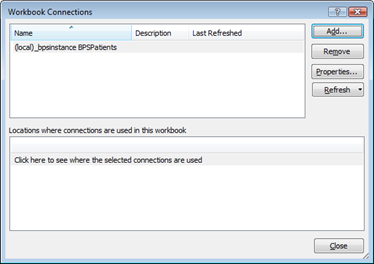
- If you have created a connection, selecting Connections from the Data tab will open the Workbook connections screen.
- Select the Bp Premier connection, click Properties, and select the Definition tab.
- Tick the Save Password box if you don’t want to have to enter the password each time you want the data to refresh.
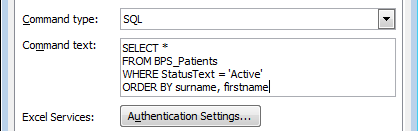
Set the Command Type to 'SQL'.
Enter your SQL query into the Command Text.
- For advanced queries, Best Practice Software recommend using a SQL query tool like SQL Management Server to make sure that the query produces the data required, and then insert the query in the Command Text field. Best Practice Software Support can assist with advice on queries. Commonly requested data includes invoices and item numbers, reminders, appointments, payments, observations, prescriptions and diagnoses.
- Click Ok to save the query to the ODBC connection.

The only options to change here are the Save password, Command type and Command text.
IMPORTANT This is a potential security issue, because anyone with access to the unlocked spreadsheet would be able to access Bp Premier data. Consult your practice's data security policies before saving the password.

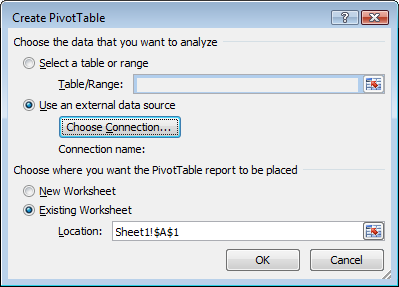
Create a pivot table from Bp Premier data
- In the Insert tab of Excel, select Pivot Table.
- Select Use an external data source and click Choose connection. Select the connection you created earlier.
- Click OK. You will be prompted for the field layout and filters for your pivot table.
TIP Refer to the Excel Help for assistance in configuring your pivot table.
Last updated 23 July 2020


 AU
AU 