This article describes how to set up sessions and holiday periods for the appointment book, including after hours and 'on the day' blocks of time.
What is an appointment book session?
An appointment book session is a period during which the practice or provider is able to take appointments and provide consultations. For example, a morning session for a provider might be from 9am to 1pm, before a scheduled lunch break. An afternoon session for the same day might be from 2pm to 5.30pm.
You can create default practice sessions, which are automatically assigned when a new provider record is created. You can also create tailored session times for individual doctors, including after-hours times.
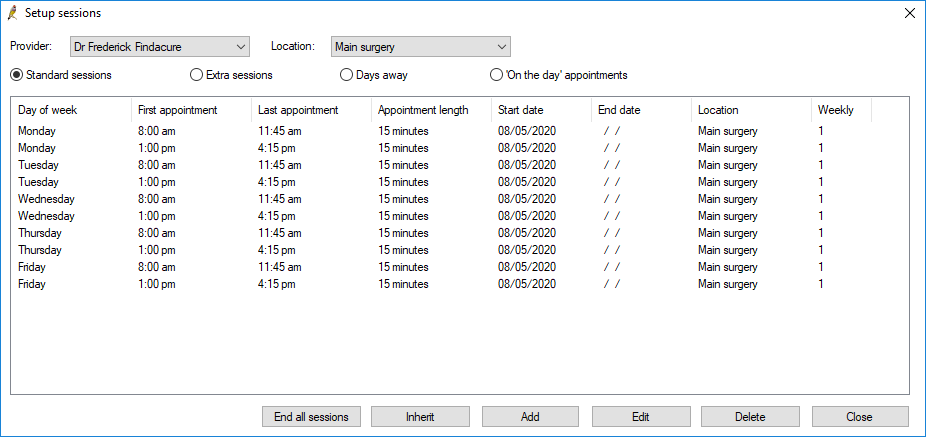
Sessions are managed from the Setup sessions configuration screen. Users require the permission Setup sessions set to 'Add/Edit/Delete' to manage sessions from this screen.
Does Bp Premier support rosters?
Session times can be scheduled for a rolling roster cycle, where a provider will have different weekly times over a roster that lasts one to four weeks.
Set default practice sessions
Whenever a new user is added, if they have the Has appointments box checked, Bp Premier will ask whether they should use the practice default sessions. If you answer 'Yes', the new user will be given the practice default sessions and reserved appointments.
- From the main screen of Bp Premier, select Setup > Sessions, or press Shift+F6. The Setup sessions screen will appear.
- Select 'Practice defaults' from the Provider dropdown.
- Select the Standard sessions radio button.
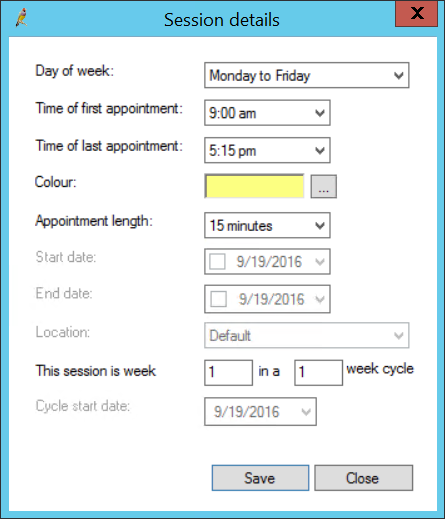
- Click Add. The Session details screen appears.
- Select a Day of week to set default session times for, or select 'Monday to Friday' to set a session time for the five weekdays at once.
- Select a time of first appointment and time of last appointment to set the session times.
- Select a colour for the session to be displayed in the appointment book.
- Set an appointment length. The minimum length available will depend on the Appointment length setting in the Appointments tab of the Configuration screen.
- If all of your practice's providers work on a roster cycle, complete the This session is week... fields to set default roster sessions for new providers. Otherwise, ignore these fields.
- Click Save to save the practice session time.
- Repeat steps 3—9 to add all practice sessions.


Set practice or provider holidays
- From the main screen of Bp Premier, select Setup > Sessions, or press Shift+F6. The Setup sessions screen will appear.
- Select 'Practice defaults' from the Provider dropdown to set a practice-wide holiday, or select a provider to set a holiday just for that provider.
- Select the Days closed or Days away radio button.
- Click Add. The Days closed or Days away screen appears.
- Select the First day closed and Last day closed. The selected period will be marked and colour-coded as unavailable in the appointment book.
Bp Premier will alert the user if a booking is made for a closed period. Existing appointments will not trigger an alert if the appointment day is configured as a holiday.
Set session times for a provider
- From the main screen of Bp Premier, select Setup > Sessions, or press Shift+F6. The Setup sessions screen will appear.
- Select the provider to set up sessions for from the Provider dropdown. A provider must have the Has appointments box checked in the Setup > Users screen to be listed in this dropdown.
- Select the Standard sessions radio button.
- Click Add to add a new session, or select a default session and click Edit. The Session details screen appears.
- Select a Day of week to set default session times for, or select 'Monday to Friday' to set a session time for the five weekdays at once.
- Select a time of first appointment and time of last appointment to set the session times.
- Select a colour for the session to be displayed in the appointment book.
- Set an appointment length if different from the default. For example, a doctor may set aside one afternoon a week to perform excisions, which require a 30 minute time slot.
- If necessary, select a Start date and End date for the session time.
- Set the Location that the session is for.
- Use This session is week to set recurring sessions over a roster cycle, and set the cycle start date.
- Enter This session is week 2 in a 4 week cycle
- Set a cycle start date to the date of Monday before last.
- Click Save to return to the Setup sessions screen.
Start and end dates determine when the session will show in the appointment book. For example, you could start a new doctor a month from now, without any risk that the doctor will get booked prior to the start date. Dates also prevent appointments being booked for a doctor after the date that they leave the practice.
For example, if a provider is on the second week of a four-week roster that runs Monday to Sunday:
Set after-hours sessions for a provider
You can set sessions for providers that are outside the provider's or practice's normal office hours.
- From the main screen of Bp Premier, select Setup > Sessions, or press Shift+F6. The Setup sessions screen will appear.
- Select the provider to set up sessions for from the Provider dropdown.
- Select the Extra sessions radio button.
- Click Add to add a new extra session, or select a session and click Edit. The Extra session screen appears.
- Complete the fields in the screen, which are identical to the Session details screen.
Bp Premier users can now book appointments for the provider at the nominated extra times.
Set on the day appointment sessions
'On the day' or reserved appointment slots are displayed in the appointment book as 'On the day' on all days later than the current date. On the day slots indicate appointments that are not to be used until the appointment date, ensuring that there are always free appointments available on the day. These slots are displayed in a light purple colour.
When a slot is displayed as 'On the day', attempting to book an appointment in the slot will display a warning that it is an on the day appointment. Users with the permission Override on the day appointments set to 'Allowed' can override the warning and make a booking.
For example, your practice's booking policy may require that a certain number of hours or sessions per day are available on an 'on the day' basis.
- From the main screen of Bp Premier, select Setup > Sessions, or press Shift+F6. The Setup sessions screen will appear.
- Select 'Practice defaults' from the Provider dropdown.
- Select the 'On the day' appointments radio button.
- Select a day to nominate an 'on the day' session time and click Edit. The Session details screen appears.
- Set the 'on the day' slot using the Time of first appointment and Time of last appointment fields.
- Change the appointment length for this time slot, if necessary.
- Click Save to save the 'on the day' slot.
- Repeat steps 4—8 to enter all on the day slots for the week.
Inherit Sessions From Another User
If you have a user who does not have sessions set up, you can inherit the session setup of another user.
End a provider's sessions
To end a provider's standard sessions:
- In the Setup sessions screen, select the provider for whom you wish to remove standard sessions from the Provider drop-down.
- Click End all sessions. The End all standard sessions screen will appear.
- Select an end date and click OK.
To remove Extra sessions:
- In the Setup sessions screen, select the provider for whom you wish to remove extra sessions from the Provider drop-down.
- click the Extra sessions radio button.
- Select the date that you want to end the extra sessions for and click Delete.
- Click Yes on the alert box that will appear.
To remove 'On the day' appointments:
- In the Setup sessions screen, select the provider for whom you wish to remove 'on the day' appointments from the Provider drop-down.
- Click the 'On the day' appointments radio button.
- Select the day of the week that you wish to remove on the day appointments from and click Edit. The 'On the day' appointments screen will appear.
- Uncheck any On the day appointment timeslots that you no longer require and click Save.
copy inherit clone sessions
What do I do next?
Last updated 23 July 2020