
Bp Premier displays the various documents held in the database via the Document Viewer. Broadly speaking the Document Viewer allows the viewing of PDF, images, Microsoft Word, RTF and plain text files. When attempting to view a file inside Bp Premier that is not supported by the Document Viewer, an effort is made to open the file in the program registered on your computer to handle that file type.
The document viewer in Saffron SP2
In Saffron SP2, the document viewer has been replaced with an improved chromium-based viewer.
Document viewer controls in Saffron SP2
The type of file you are viewing determines what controls are available in the document viewer. The below image outlines the controls available when viewing a PDF file.
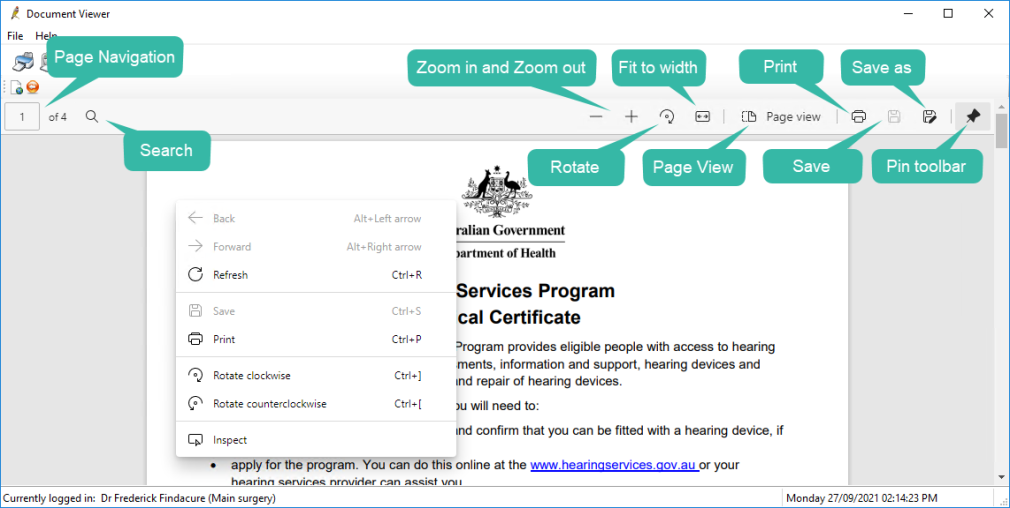
- Page Navigation: For multi-page documents, select a page in the document to navigate to.
- Search Search for a word or phrase in the document.
- Zoom in and Zoom out: Zoom closer in or farther away from a document.
- Rotate: Rotate the document clockwise.
- Fit to width: Fit the document to the size of the browser window
- Page view: Choose from a single page or two page view.
- Print: Print a copy of the document.
- Save: Save the document
- Save as: Save a new copy of the document.
- Pin toolbar: Pin or unpin the document to the top of the document.
You can also right-click the document to view further options.
The Document viewer in Saffron SP1 and earlier
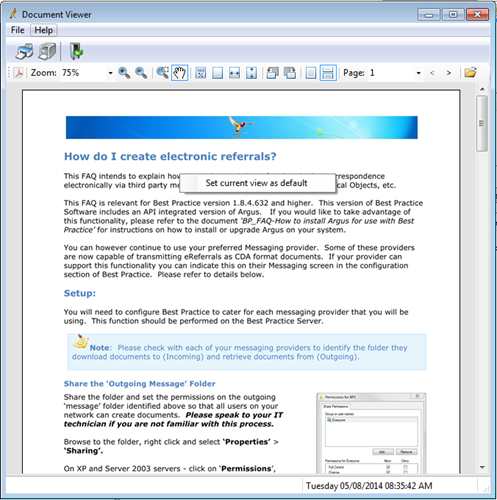
Document Viewer Controls
What type of file you are viewing determines what controls are available in the Document Viewer. The below image outlines the controls available when viewing a PDF file.

- Zoom Tools: Increase or reduce the magnification display of the file.
- Text Selection Mode: Allows selection of text from a PDF. Right-click the selected text to copy to the clipboard. Only supports copy of the text, formatting is not copied.
- Drag Mode: Allows you to hold down the left mouse button to scroll around the document.
- Fit Page Tools: Use to fit the page within the display area using either the document width, height or both.
- Page Rotation: Rotate the page either clockwise or counterclockwise.
- Scrolling Mode: Show a single page at a time or allow scrolling through the document.
- Page Navigation: Choose a page to go to or use the < and > buttons to go forward and backward through the document.
- Open File Externally: Open the file in the program registered on your computer to handle that file type.
IMPORTANT You should rarely need to open a document stored in Bp Premier in an external application. The document viewer will display all common image and document types, including .rtf and PDF files. Best Practice Software recommend keeping the number of files opened externally at the same time to a minimum.
Set the Default Zoom
You can set the default zoom size for the document viewer.
- View a document from any of the Bp Premier functions. The top left of the toolbar shows the file type of the viewed document.
- Using the image toolbar at the top of the screen, set your view to suit how you would like to see this type of document each time you open the document viewer:
- Zoom %
- Fit to window
- Fit width
- Fit height.
- Right-click on the document and select Set current view as default.
A message will be displayed confirming the default view that has been set. From now on, each document that you view of this type will be displayed at that view setting.
NOTE Because viewer settings are stored by user and document type, you will need to repeat the steps above for both PDF and image file types.
Troubleshooting
You may require assistance from your IT provider to complete the below troubleshooting steps.
WebView2 Runtime error
If you experience the below WebView2 error, this means that WebView2 has failed to download during your install of Bp Premier.
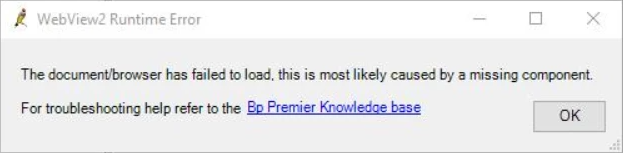
This is likely due to the computer not being connected to the internet at the time of installation.
To resolve this error:
- Click here to download the Microsoft WebView2 runtime.
- Once the download has finished, navigate to the Downloads folder on your computer and locate the file MicrosoftEdgeWebview2Setup.exe.
- Right-click on MicrosoftEdgeWebview2Setup.exe and select Run as administrator. If the User Account Control alert appears, click Yes.
- Restart Bp Premier to run it with WebView2.
The WebView2 runtime download screen will appear.
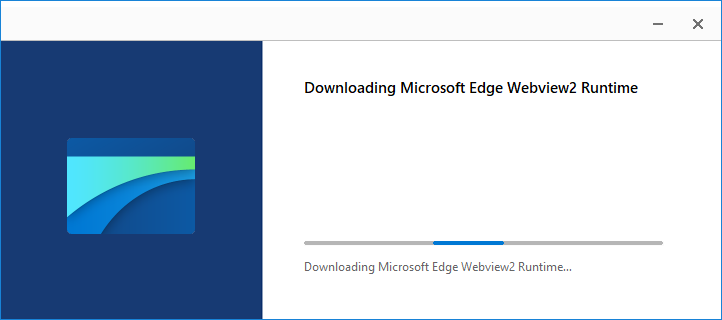
Once the download is complete, the screen will close.
Documents appearing blank
If the document viewer displays a blank screen when you attempt to view a document, try the following solutions.
Run Bp Premier as an administrator
- Close Bp Premier.
- Right-click the Bp Premier desktop item and select Run as administrator.
- Access the file you are having issues viewing.
- Close Bp Premier.
- Re-open Bp Premier as a normal user.
- Navigate to the file again and see if you can access it.
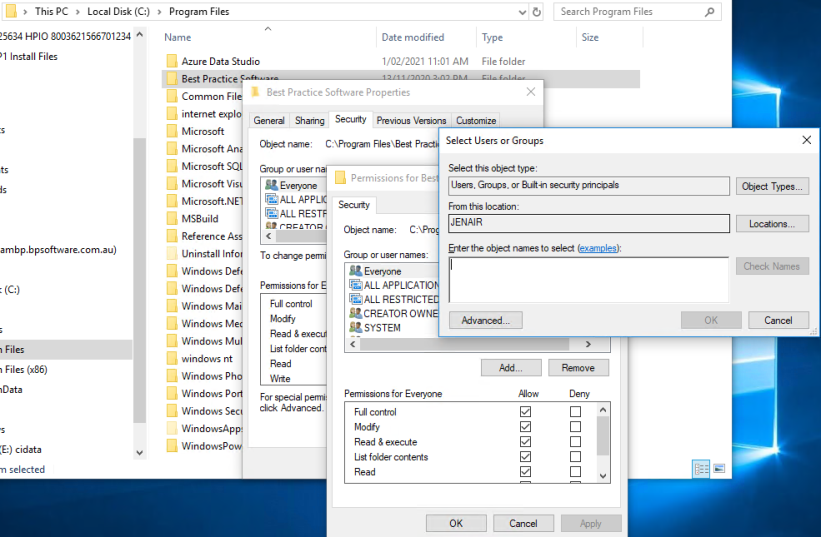
Change the Best Practice Software folder permissions
- In your computer's file browser, navigate to C:\Program Files, right-click Best Practice Software and select Properties. The Best Practice software Properties screen will appear.
- Select the Security tab, and click Edit > Add. The Select Users or Groups screen will appear.
- In the Enter the object names to select field, type Everyone and click OK.
- Select the new Everyone group in the Group or user names section and tick Allow for the Full control permission.
- Click Apply.
Change the Edge Web View Application folder permissions
- In your computer's file browser, navigate to C:\Program Files (x86)\Microsoft\EdgeWebView, right click Application and select Properties. The Application Properties screen will appear.
- Follow steps 2-5 in the Best Practice Software folder section above.
Change Temp folder permissions
- In your computer's file browser, navigate to C:\Users\%Userprofile%\AppData\Local, right click Temp and select Properties. The Temp Properties screen will appear.
- Follow steps 2-5 in the Best Practice Software folder section above.
- Repeat for all user profiles in C:\Users.
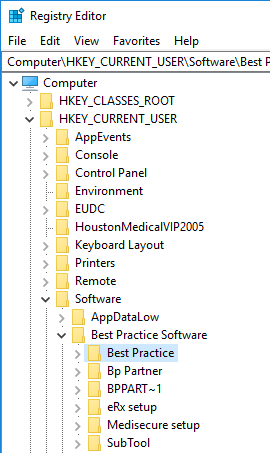
Change Registry key permissions
- Search for 'registry editor' or 'regedit' in the Windows search bar and click on the search result. The Windows Registry Editor will appear.
- Navigate to Computer\HKEY_CURRENT_USER\SOFTWARE\Best Practice Software\Best Practice.
- Right-click on the Best Practice folder and select Permissions. The Permissions for Best Practice screen will appear.
- Click Add. The Select Users or Groups screen will appear.
- In the Enter the object names to select field, type Everyone and click OK.
- Select the new Everyone group in the Group or user names section and tick Allow for the Full control permission.
- Click Apply, then click OK.
- Navigate to Computer\HKEY_LOCAL_MACHINE\SOFTWARE\WOW6432Node\Best Practice Software.
- Repeat steps 3-7 for the Best Practice Software folder.
Add exceptions in Anti-virus software
In your practice's anti-virus software, set up exceptions for each user profile's Temp folder (e.g. C:\Users\%Userprofile%\AppData\Local\Temp).
An exception will also need to be set up in your anti-virus software for msedgewebview2.exe.
Clear the temp directory
Navigate to C:\Users\%Userprofile%\AppData\Local\Temp and remove all contents from this folder.
Sites using a Citrix Environment
If your site uses a Citrix environment, your IT provider may need to disable Citrix API hooks.
See How to Disable Citrix API Hooks on a Per-application Basis for more information.
Sites using FSLogix
If your practice uses the latest version of FSLogix and has a file redirection in place for the temp directory (C:\Users\%Userprofile%\AppData\Local\Temp), disable the redirection
Update the following registry key:
- Search for 'registry editor' or 'regedit' in the Windows search bar and click on the search result. The Windows Registry Editor will appear.
- Navigate to HKEY_LOCAL_MACHINE\SOFTWARE\FSLogix\Profiles.
- On the right side of the screen, there will be an entry called SetTempToLocalPath. Right-click SetTempToLocalPath and select Modify. The Edit DWORD (32-bit) Value screen will appear.
- Update the Value data field to 2 and Click OK.
File not found error
If you receive a File not found error when attempting to view a document, this may be due to an installation issue.
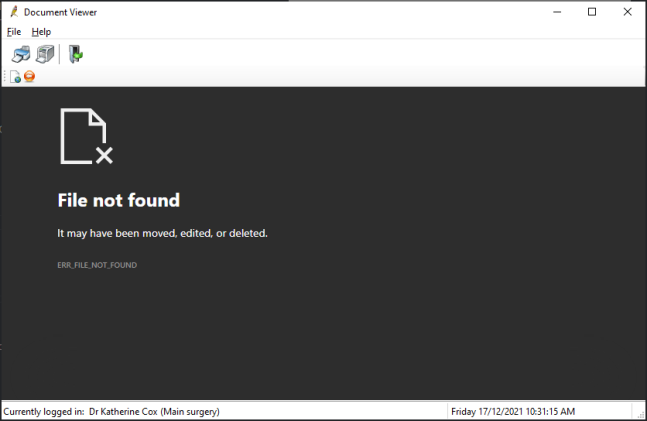
To fix this issue, re-run your latest Bp Premier program update as an administrator.
Related links
Last updated 21 December 2021


 AU
AU 