The Bp Premier and Tyro integration offers:
- Integrated EFTPOS (payment by EFTPOS and Credit Card)
- Integrated Medicare Easyclaim (Patient claiming rebates).
Before you begin
Before you can use Tyro with Bp Premier, you must carry out the following configuration. Some of the steps may require contact with Tyro support. Bp Premier Support cannot assist with the installation of Tyro hardware or software.
- Ensure the latest version of Bp Premier is installed on the server and all workstations.
- Register your practice with Medicare to use Online claiming, configure Online claiming, and test that it works correctly. See Set up Online Claiming for single Minor ID for more information.
- Purchase a physical Tyro terminal.
- Download the Tyro Terminal Adapter Configuration Software and install the software on each workstation that needs to access the Tyro terminal.
- Configure Bp Premier for use with Tyro
- Configure Bp Premier with the Tyro Merchant ID.
Steps 4–6 are described below.
Tyro also requires a persistent internet connection on the workstation connected to the Tyro Terminal.
Install the Tyro Terminal Adapter Configuration Software
To obtain the Tyro Terminal adapter software, follow the instructions provided with the terminal device, or download and follow the instructions in Tyro's TTA Installation guide available at: www.tyro.com/guides
IMPORTANT Best Practice Software recommends consulting your practice's IT support for advice before installing the Tyro Terminal hardware and adapter software.
Install the adapter software on each workstation in your network that requires access to the Tyro Terminal. For example, workstations used by GPs that do not process payments will not need the adapter installed, but any reception workstations that process Medicare payments and claims will require adapter installation.
After this process, each configured workstation will be 'paired' with the Tyro Terminal device.
The Merchant ID and Terminal ID will be provided by Tyro when you purchase a terminal. Note these items down; you will require them in the last configuration step.
Configure Bp Premier for use with Tyro
Complete the steps in this section on every server or workstation successfully paired with the Tyro Terminal.
Turn on Tyro Easyclaim functionality
- Log in to Windows on the Bp Premier server or workstation as a Windows user with administrator privileges.
- Browse to the folder C:\Program Files\Best Practice Software\BPS.
- Right-click the file Tyro Setup.exe and select Run as Administrator. A Login window will appear.
- Log in using a Bp Premier username and password with configuration permissions enabled. The Tyro Setup screen will appear.
- Tick the checkbox Use Tyro Patient claiming and click Save.
Set up Online Claiming with Tyro
- On the same computer, log into Bp Premier as a user who has access to configuration.
- Select Setup > Configuration > Online Claiming. The Configuration screen will appear.
- Select the Online Claiming tab.
- The Activate Online Bulk Bill Claiming field should already be ticked if you have been using Medicare or DVA Online claiming. Do not change this setting.
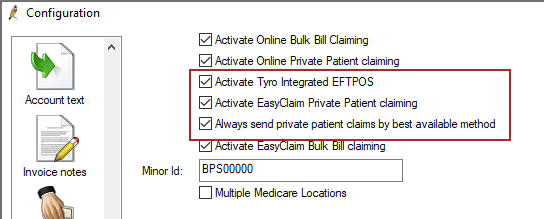
- Select Activate Online Private Patient claiming to activate Send private patient claiming when creating payments.
- Select Activate Tyro Integrated EFTPOS.
- Select Activate Easyclaim Private Patient claiming
- Tick Always send private patient claims by best available method to automatically select either Send via Patient claiming or Send via Easyclaim on the payments screen:
- If unticked, neither option will be ticked automatically on the payments screen.
- If you are using both Online Private Patient claiming and Easyclaim Private Patient Claiming, Send by Easyclaim will be ticked automatically on the payments screen.
- If you use only one claiming method, only that option will be ticked automatically on the payments screen.
- Press Save to update online claiming settings.
NOTE If this field is not ticked, this usually indicates online claiming has not been configured yet. Follow the instructions in Set up Online Claiming for single Minor ID and restart this procedure.
This option allows you to send claims to Medicare and pay the rebate into the bank account that the patient has registered with Medicare. If the patient has no account registered with Medicare, a cheque will be posted to the patient. Rebates are paid into the registered bank account in 24–48 hours.
This option can be used where the patient is not eligible to send the claim via Medicare Easyclaim (for example, multiple attendance items, or items requiring notes).
Tyro Integrated Easyclaim allows rebates to be paid instantly to the bank account associated with a patient's EFTPOS card.
NOTE If the Activate Medicare Easyclaim claiming check box is disabled, Bp Premier cannot connect to the Tyro terminal. Follow the instructions in Install the Tyro Terminal Adapter Configuration Software and ensure the Bp Premier server can connect to the terminal device.

NOTE These settings will take effect system-wide. However, the Use Tyro and Send via Easyclaim options will not appear on the payments screen if a workstation has not been paired with the Tyro terminal. Follow the instructions in Install the Tyro Terminal Adapter Configuration Software to pair a workstation with the terminal.
Set the default Payment Type
- Select Setup > Configuration from the main Bp Premier screen. The Configuration screen will appear.
- Select the Billing tab.
- The Payment type field determines the active payment type when you first open the Payment details screen. The default is 'Cash'. Set this field to 'EFT' if you regularly use Tyro for payments.
- Press Saveto update billing settings.

Set up the Tyro Merchant ID
Tyro will provide your practice with a Merchant ID (MID) for each bank account you have registered with Tyro. You must link the Merchant IDs to the bank account records set up in Bp Premier.
Complete this procedure once on any workstation successfully paired with the Tyro Terminal.
- Select Setup > Configuration from the main Bp Premier screen. The Configuration screen will appear.
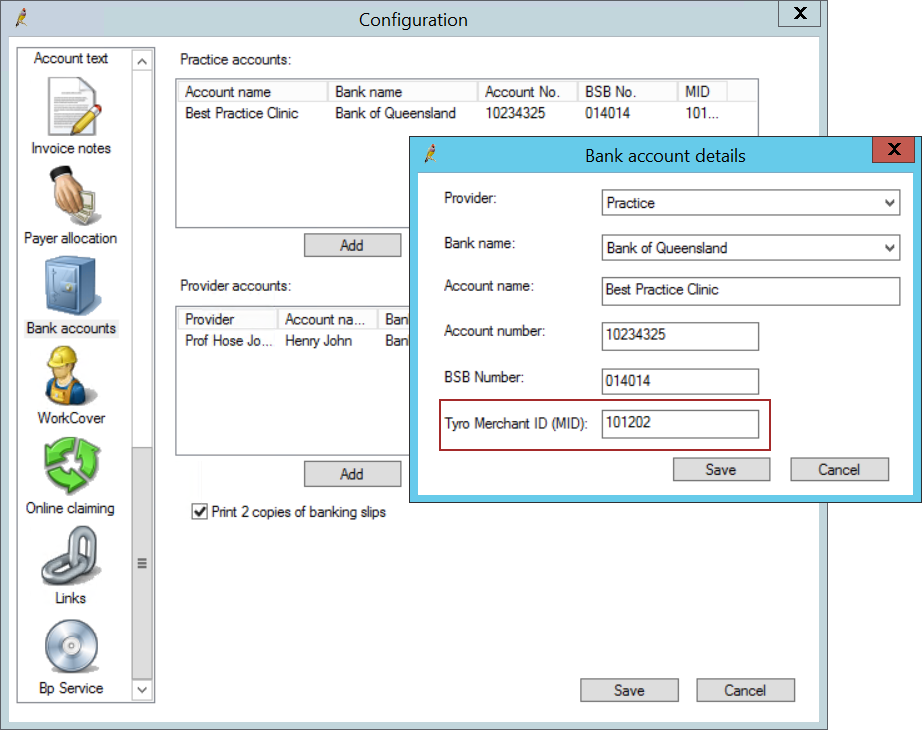
- Select the Banks Accounts tab.
- If the practice has only one bank account, you only need to edit the Practice account. Select the practice account listed in the top section and click Edit. The Bank account details screen will appear.
- Enter the Tyro Merchant ID (MID) provided to you by Tyro for the practice bank account and click Save.
- If your practice has more than one practice account, repeat steps 3–4 for each practice account, using the Tyro MID provided for each practice account number.
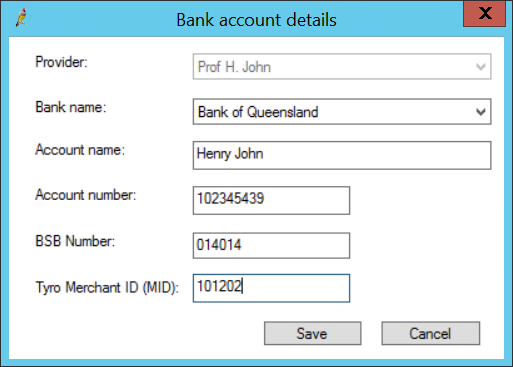
- If your practice deposits payments into separate provider bank accounts, you must nominate a Merchant ID for each provider account. Repeat steps 3–4 for each provider account by clicking Edit under the Provider accounts list. Enter the Tyro MID for each provider account number.
- Click Save.


NOTE Each time a payment is entered into the system, the screen will display the Merchant ID (MID) and Terminal ID (TID) associated with the payment. If a provider has their own MID recorded, the screen will show the provider's MID; otherwise, the screen defaults to the MID associated with the first practice bank account.
Tyro setup is now complete.
Troubleshooting
Tyro can assist with questions regarding processing payments and Integrated Medicare Easyclaim transactions. Tyro has a dedicated Easyclaim support option that can be accessed after calling the general support line.
Tyro Customer Support Team: 1300 966 639
Account Manager: (02) 8907 1717 and am@tyro.com
What do I do next?
Last updated 23 July 2020