Get Started
Set up
Clinical
Patient Comms
Management
Tools & Utilities
- What's New?
- COVID-19 and Bp Premier
- Program, drug, and database updates
- Install for the first time
- Set up Management
- Set up Clinical
- Convert or merge a database
- Link or convert billing data
- Medicare Web Services
- Billing and Banking
- Appointment Book
- Users
- Medicare, DVA, and Tyro
- My Health Record
- Prescribing
- Secure messaging and online directories
- Pathology and imaging
- Bp Comms and Best Health App
- Add a new ?
- Document templates and printing
- Reminders and Actions
- Clinical integrations
- Commbank Smart Health
- COVID-19 and Bp Premier
- Prescribing and Medication
- Today's notes
- Pathology and Imaging
- My Health Record
- Clinical Reminders
- eReferrals
- Clinical tools
- Enhanced Primary Care
- Immunisations
- Diabetes
- Best Health App
- Patient consent
- Contact notes
- Send Bp Comms to patients
- Use the word processor
- Medicare Web Services
- COVID-19 and Bp Premier
- Reporting
- Booking appointments
- Invoice and pay on the day
- Invoice and pay later
- Correct an account or payment
- Claim with Medicare and DVA
- Banking reconciliation
- WorkCover
- Troubleshooting
- Back up and restore data
- Remote database
- Query data
- Database Integration
- Merge data
- Import and export data
- Maintain data
Title
Overview
Uninstalling Bp Premier completely requires you to:
- Remove the Bp Premier program.
- Delete any remaining registry entries.
- Remove the \Program Files\Best Practice Software folder.
- Stop Bp-related Windows Services.
- Uninstall the SQL database.
- Delete the SQL instance folder.
Bp Premier uninstallation will require administrator permissions to remove software and configure Windows components. Before starting any of the instructions below, log in to the server computer as a Windows Administrator, or have your IT support carry out the installation. If you have Windows User Access Control or SmartScreen enabled, Windows will prompt for confirmation to proceed for some instructions.
IMPORTANT If you are using a live version of Bp Premier and are uninstalling the server, always perform a backup of the Bp Premier database and test a restore before uninstalling the database. See Back up and restore Bp Premier for more information.
Confirm your version of MSSQL and record the server data path
- Log in to Bp Premier on the server that you are about uninstall.
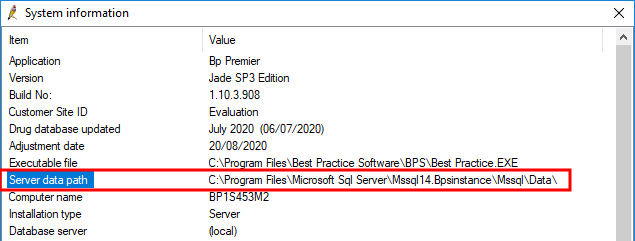
- Select Help > About > System info from the main screen.
- Record the Server data path (the folder will be manually deleted later).
- Scroll to the bottom of the list to where it says SQL Server Version, and record the value. An example of how the value may look is 15.0.2000.5 RTM Express Edition (64-bit).
- Close Bp Premier.
Version number | Named version |
|---|---|
10.50 | SQL Server 2008 R2 |
11.0 | SQL Server 2012 |
12.0 | SQL Server 2014 |
13.0 | SQL Server 2016 |
14.0 | SQL Server 2017 |
15.0 | SQL Server 2019 |
Uninstall Bp Premier
Follow the instructions below to uninstall a Bp Premier client or server.
Remove the Bp Premier program
- On the computer on which you are uninstalling Bp Premier, close Bp Premier and any windows and applications you have open.
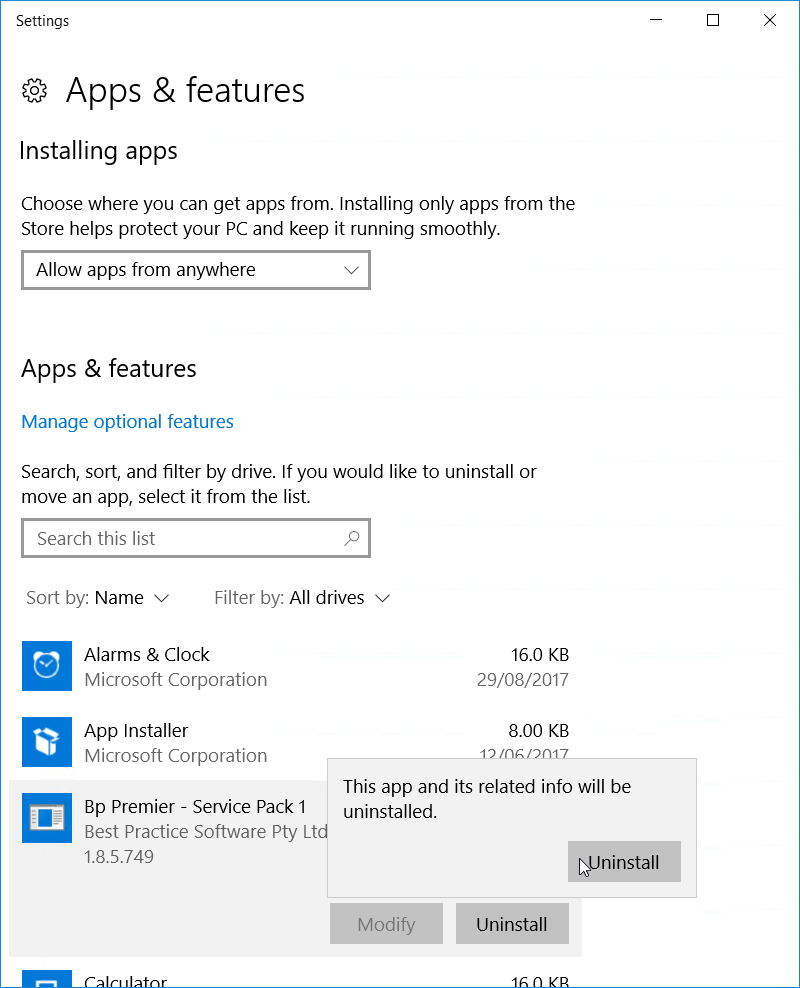
- Open Windows Add and Remove Programs. The path will depend on the version of Windows, but is available from Start > Control Panel.
- Select Bp Premier in the list and click Uninstall.
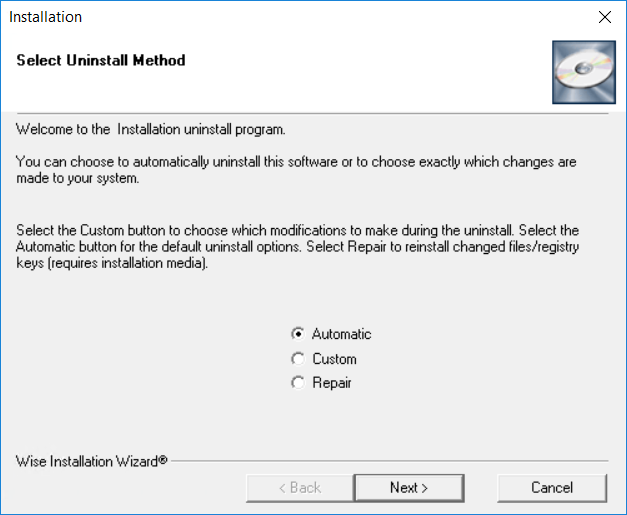
- A User Access Control popup may request confirmation that you want to remove the software. Click Yes. The Windows Installation uninstall program will appear.
- Leave Automatic selected and click Next. Click Finish in the next screen. Windows will remove the major components of Bp Premier and exit the uninstaller.
NOTE The following example shows how to uninstall Bp Premier from Add and Remove Programs in Windows 10. The process is similar, but the screens may be different to your version of Windows. If you need help uninstalling the program, your IT support can assist.
Delete registry entries
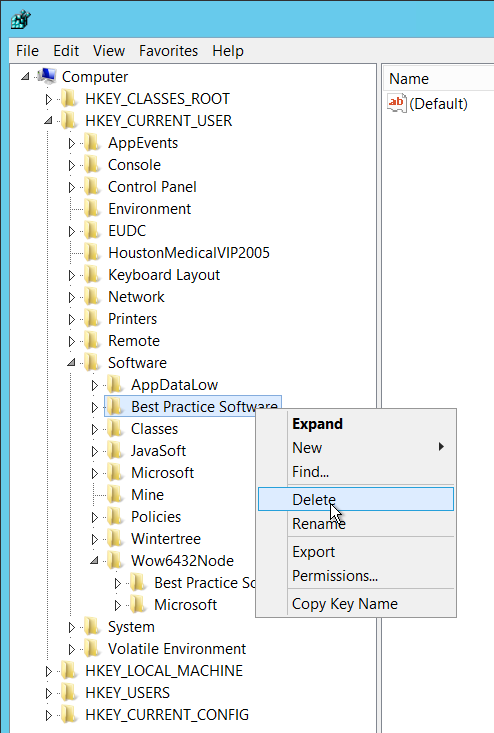
- Open the Windows command prompt or Run dialog, type 'regedit', and press Enter. Or search for 'registry editor' in the Windows search bar. The Windows Registry Editor will appear.
Delete the following folders:
- HKEY_CURRENT_USER \ Software \ Best Practice Software
- HKEY_CURRENT_USER \ Software \ Wow6432node \ Best Practice Software (if computer is 64-bit)
- HKEY_LOCAL_MACHINE \ Software \ Best Practice Software (if computer is 32-bit)
- HKEY_LOCAL_MACHINE \ Software \ Wow6432node \ Best Practice Software (if computer is 64-bit)
To delete a folder, expand the tree until the folder is visible, right-click, and select Delete.
- Close the registry editor.
Remove the Best Practice Software folder
- In a Windows file explorer, browse to C:\Program Files.
- Right-click the folder Best Practice Software and select Delete. A message will display: ‘Are you sure you want to move this folder to the Recycle Bin?' Click Yes.
- Go to Start or Apps > Control Panel > Administrative Tools > Services to open the Services window. The exact path will depend on your version of Windows.
- Right-click on the following services and select Stop:
- Best Practice NPS Service
- Best Practice Service
- Best Practice Messaging Service
- Best Health App Receiving Service
- eRx Standard Adapter Service
- eRx Standard Adapter Store and Forward Service
- Close the services screen.
- Repeat steps 1-2 to delete the Best Practice Software folder.
NOTE On the later versions of BP Premier, this folder is deleted with the uninstall. If this folder does not exist, you can move on to uninstalling the database.
Windows may alert that files in the folder you are trying to delete are still in use. If so, you must stop some services before you can delete the folder.
Stop services
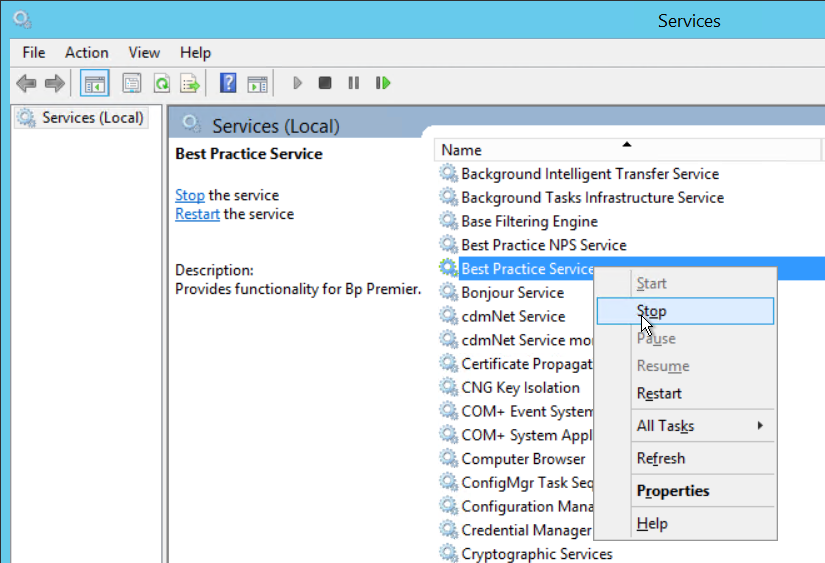
If you find the services will not stop, restart the PC and repeat steps 1-2.
Uninstall the database
These instructions describe how to completely uninstall an Express edition of MSSQL. If your practice uses a full edition of MSSQL, Best Practice Software recommend consulting your IT support or database administrator to uninstall the full edition database. Check the MSSQL version you recorded in Confirm your version of MSSQL and record the server data path to see whether you have the express or full version.
IMPORTANT Alwaysback up the Bp Premier database on Production or live sites before uninstalling the database. See Back up and restore Bp Premier for more information.
The MSSQL uninstall wizard may appear slightly different, depending on the version of MSSQL that was installed and your version of Windows. The instructions below describe how to uninstall SQL Express 2017 on Windows 10. The process below can be followed for any supported version of MSSQL.
If you need to uninstall an older version of MSSQL, instructions for removing SQL Server 2008 R2 are available from the version Indigo knowledge base.
IMPORTANT The instructions in this section assume that only Bp Premier uses MSSQL installed on the Bp Premier server, and will completely remove all MSSQL functionality. If you have other applications installed on the Bp Premier server computer that use MSSQL, do not remove any MSSQL shared features in step XX, and only remove the BPSINSTANCE database. Best Practice Software recommend consulting your IT support or database administrator if you need to uninstall the Bp Premier database in a shared environment.
MSSQL will need to be uninstalled on both workstation (client) and server machines.
Uninstall MSSQL 2017 on Windows 10
Uninstall the BPSINSTANCE database
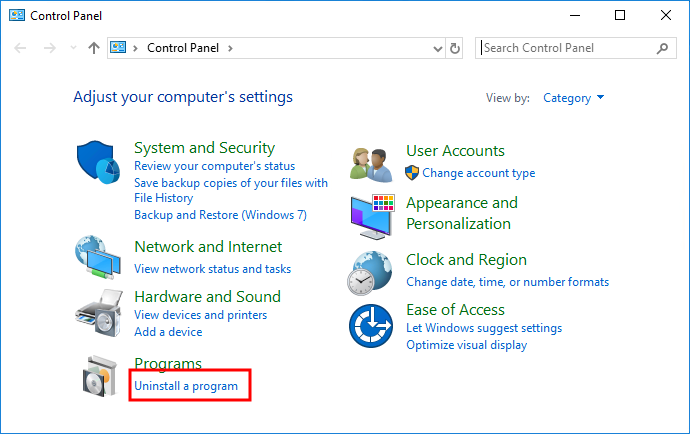
- From the Windows desktop, search for 'Control panel' in the bottom left search box. Open the Control panel app. If you cannot see this option, you may not have permission to access the control panel.
- Select Uninstall a program. The Programs and features screen will appear.
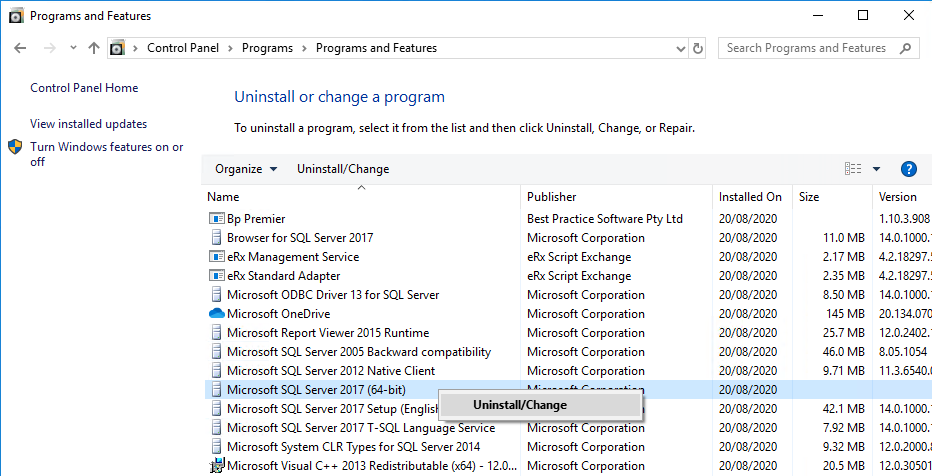
- Right-click the entry for your version of MSSQL and select Uninstall/Change.
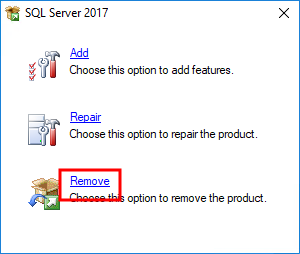
- If Windows prompts to confirm you want to proceed, click Yes. The SQL Server 2017 screen will appear with options.
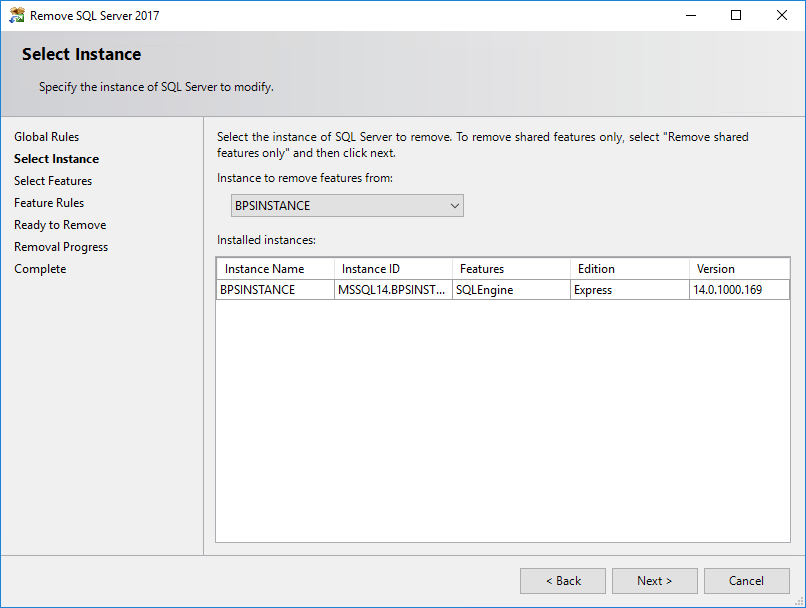
- Click Remove. The MSSQL uninstall wizard will open at the Select instance panel.
- Select 'BPSINSTANCE' from Instance to remove features from dropdown. If BPSINSTANCE is one of many instances available to remove, remember this for the next step. Click Next.
- Tick Database Engine Services under BPSINSTANCE.
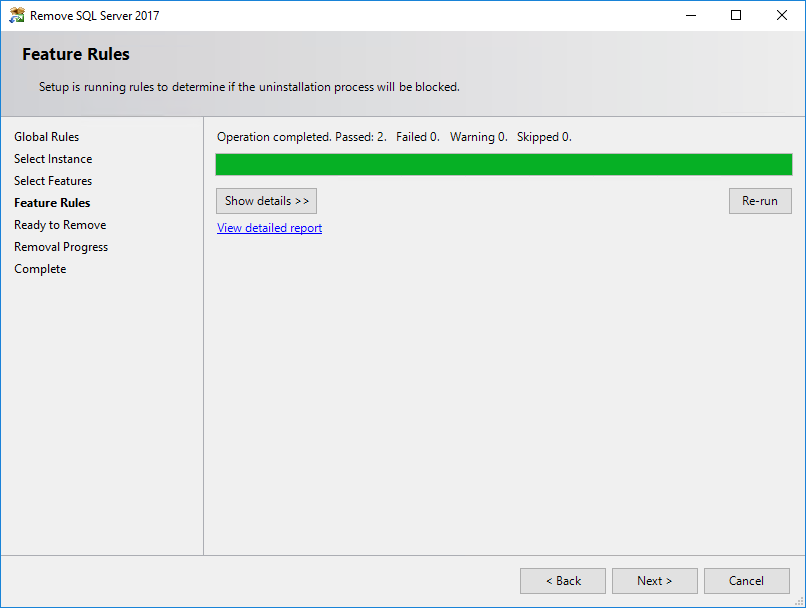
- Click Next. The uninstall wizard will process rules to determine if removal is permitted.
- If there are no blockers, the wizard may move automatically on to the Ready to Remove panel. Otherwise, click Next.
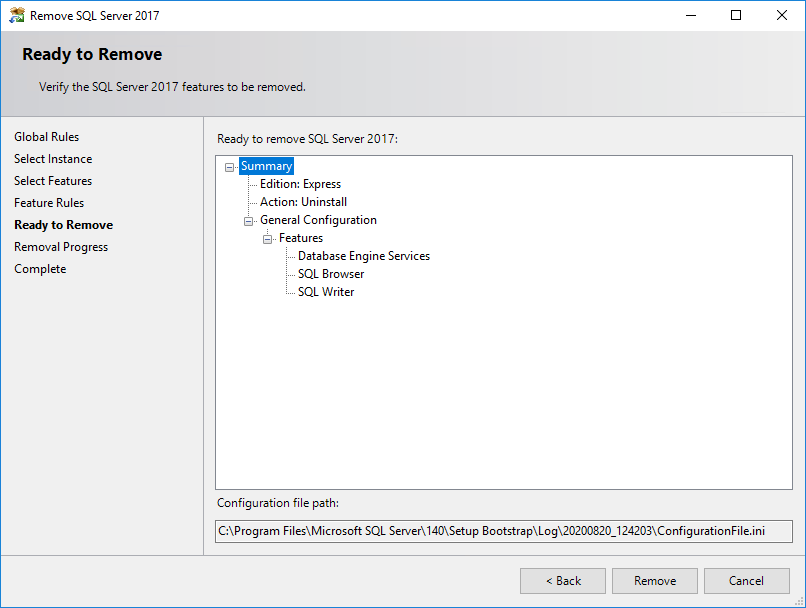
- Click Remove. The uninstall wizard will remove the Bp Premier database instance. The Complete screen will be displayed when the removal process has completed.
- Click Close to finish.
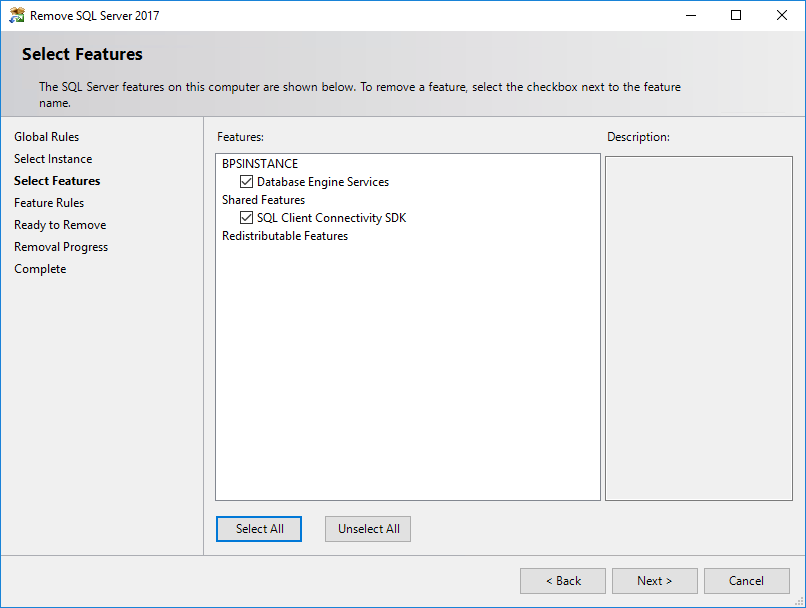
If other database instances were available in step 10, leave all options under Shared Features unticked. This will leave any shared features available to the remaining database instances.
If BPSINSTANCE was the only selection, tick the Shared Features options also to remove these features.
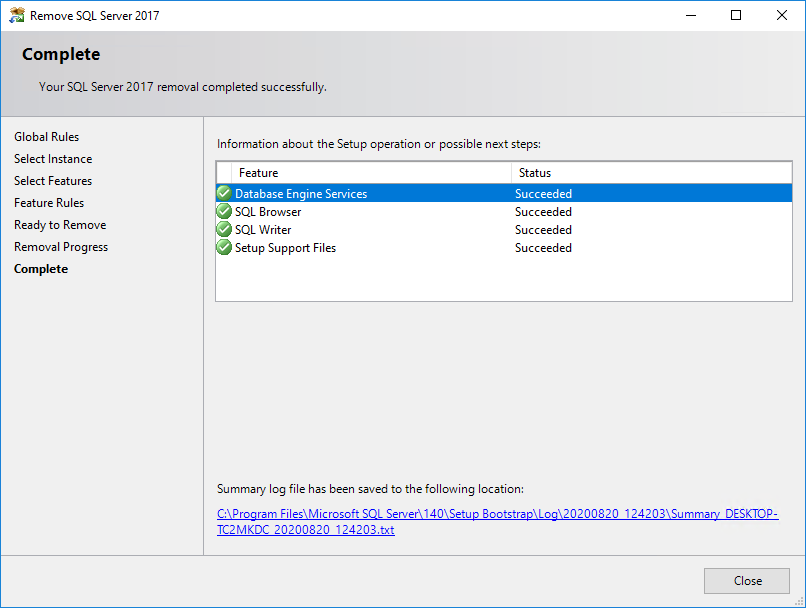
Delete the database instance folder
- Using Windows file explorer, browse to the 'Microsoft SQL Server' folder of the database path that was recorded in Confirm your version of MSSQL and record the server data path.
- Right-click the folder and select Delete. In the example above, the folder 'MSSQL14.BPSINSTANCE' is being deleted.
- If Windows prevents you from deleting any files in the subfolder, you may not have permission to delete the files, or a service may still be running. Stop all SQL services or log in as a Windows administrator.
- In the Services window, check if the service SQL Server (BPSINTANCE) exists. If this service is still running, you have not fully deleted the MSSQL database.
For example, if the database path is:
browse to the folder C:\Program Files\Microsoft SQL Server.
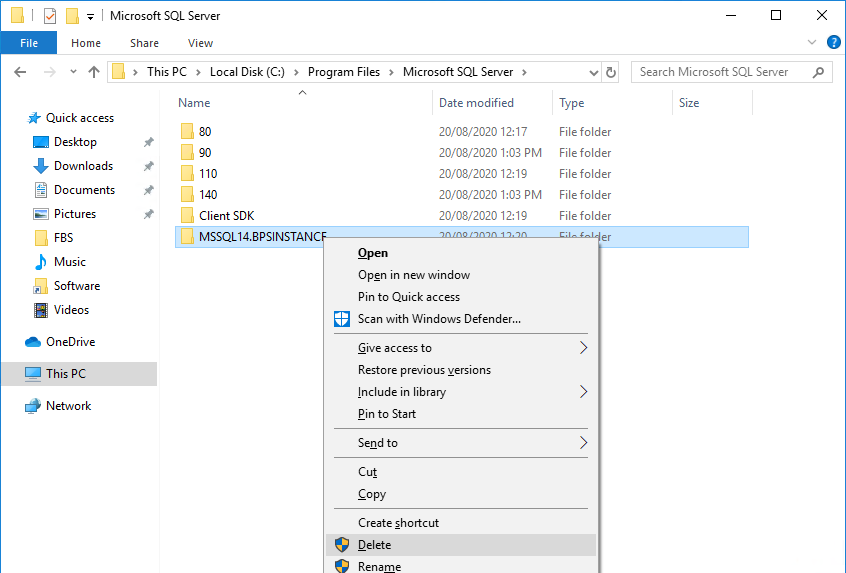
Restart your computer to finalise the uninstall process.
Bp Premier uninstallation is complete.
Troubleshooting
For advice on troubleshooting installation and uninstallation issues, see Troubleshoot installation.
If you receive the error ‘Install.log cannot be found’ while trying to install the software, this usually means that a previous Bp Premier installation did not complete successfully. Follow the instructions in this section to completely remove all components of a previous installation, and retry the installation.
Last updated 6 August 2020
Feedback
Medicare Web Services | Pathology | Bp Comms | Best Health App | Multi-location | |
|
|
This material is classified as commercial-in-confidence. Unauthorised distribution of this information may constitute a breach of our Code of Conduct, and may infringe our intellectual property rights. This information is collected and managed in accordance with our Privacy Policy, available on our website. © Copyright 2023 | |